For our fifth anniversary, I finally got around to making our wedding scrapbook. I had a lot of fun going to Michael's and buying craft supplies during post-Christmas sales. I love crafting, and I took advantage of the days before Kayla was born and while I had others in the home to watch Julie. I "gave" it to my husband for our anniversary and told him to pretend that it was the paper anniversary. He in turn bought me a Kindle Paperwhite, joking that he was also honoring the paper-anniversary.
Anyway, I really like my kindle. I love how I can look up words instantly. I love how small and light it is to carry around. I love how easy it is to hold with one hand and how my page doesn't get lost when I have to set it down. These factors make it so much easier to read when I'm nursing, and that is a huge draw for me right now. First I enjoyed Pride & Prejudice on it. Right now I'm reading a Lord Peter mystery.
Since holding it in one hand with ease is key, I don't want a traditional case for it. I don't want the extra flap that you get from the cover. Instead, I sewed a slip-case for it. I used this pattern.
A few small changes:
1) I adjusted the size for a paperwhite. I cut the back to 6 by 10 1/4 and the front to 6 by 8 1/4 inches
2) I made the pocket a bit taller: 6 by 5 1/2 inches
3) I didn't use interfacing in the pocket. Also, I used a complementary piece of fabric rather than the fleece lining. This made the pocket thinner, since I want the whole thing to be as thin as possible.
4) In the 11th step, I re-sewed the fleece lining with a 3/8 inch seam, since once I stuck the lining inside, I found that it bunched up. It needs to be smaller than the outer fabric.
5) She didn't say, as far as I saw, but you really need to trim all your seams tightly so the product is crisp.
A few things I would still do differently if I make it again:
1) I wish I had used thinner interfacing. She didn't specify which she had used, but I wish I had picked up the lighter of the two I was choosing between.
2) I wish I had made the closure flap bigger. I had a feeling I would want it to be longer, and I should have gone with my gut. The directions call for a fold-down at 2 inches. I would make it at least 3, perhaps 3.5 would be ideal. (So you'd add 3.5 inches to the length of the back when cutting). I think a longer flat would lay flat better. As it is, the corners want to fold up, and you really have to pull and push to get the velcro to attach.
3) Oh, and I wish I had done something on the front. Perhaps sewn on a applique bird, or added a monogram.
Showing posts with label crafting. Show all posts
Showing posts with label crafting. Show all posts
Thursday, May 01, 2014
Thursday, January 19, 2012
salt dough ornaments

We stamped feet and then cut around them with cookie cutters. I used a toothpick to write in her name & year.

Out came all the cookie cutters and my stamp collection. This was so fast and easy: very rewarding.
After they baked in the oven, I sprayed both sides with a polyurethane, so they should last.
I topped them off with red ribbon so they can hang on the tree.
Wednesday, January 18, 2012
more crafting
Over Christmas break I had the opportunity to try another craft inspired by pinterest.
A few days after arriving in the US, I visited a couple craft stores, and ooooh, that is a nice thing about America. I got fun supplies, was inspired by lots of creative things to buy, and started a project. Julie Anna was happily hanging out with grandparents, and I got to delve into a creative project; everyone is happy!
I made my mother a birthday board, inspired by this. It includes the names & dates for the birthdays and anniversaries of children & grandchildren. Each name & date is written on a little circle that has a hook & eye so it can hang under the correct month. On the back of the circle I put the year of the birthday or wedding. And I made more circles so more additions to the family (already one coming in June!] can be added.

Home Depot sells little bottles of paint for $1 each - samples of colors. I dug through the big dusty bin to find a fun assortment. Best of all, they come with a little brush in them, like rubber cement. I painted each circle, drilled little holes of the hook & eyes. I used alphabet stickers for the lettering, and pretty ribbon to decorate the board. Sharpie has a "paint pen" - this was new to me. It was a perfect way for me to write in the names, since I don't have a very steady hand. Plus, I included the pen in the gift so my mom can write in more dates.
Here's the final product!

Thursday, December 01, 2011
pinning projects
I've started "pinning." The addictive website pinterest is growing in popularity, and I've become rather hooked on browsing while nursing, since it's a one-handed activity.
My favorite categories are craft ideas and "diy" do-it-yourself projects around the home. But I don't like to pin projects that are unrealistic for me to do, and I really want to be more active in my creativity than a passive pinner.....
So I'm proud to present a series of products resulting from pinterest that I actually did.
1) birdies (modeled after this)

This is so far the best reproduction of a pinterest item, and the most fun, so I'll start here.

Friday afternoon after Thanksgiving I had some friends over for crafting, specifically to make these, but there was other pinterest-inspired projects going on as well...
We made a few changes from the "directions" and I'm really pleased with how they turned out.
Kristie picked up an old Czech novel for 5kc -- already "distressed," and I love that the birds'll always remind me of Prague.
 Twine would be cute, but we didn't have any, so we went with festive red and white ribbon.
I found that rubber cement works best for gluing them. I could quickly slab glue between the three birdies, position the papers as I liked, and then slide both the stick feet and the

ribbon hanger between them, avoiding the birds having a front & back side.
Rubber cement also is a nice coat on top if you want to sprinkle a layer of glitter on them. We used elmer's glue write shapes and words in glitter too. [And Julie got her first hand-made ornament!]
I hung them on our windows, in lieu of a Christmas tree this year.


2) the belly & baby photos (like this)

This didn't come out all that great, but I did take the photo before and after, like I wanted to. I just don't feel that the before shot emphasizes how HUmongus the belly was. Oh well. I'm glad she's on the outside now. =)
3) homemade baby wipes (from here)

I was very excited to see this last summer, anticipating Julie's arrival, since I know wipes are expensive. And I've started making them this fall! The directions were easy to follow, but I'd change it a bit: Half the ingredients. Maybe they meant to say it's for both halves of the paper towels and it was unclear. At least for my paper towels, 1 cup of boiling water + 1 tbsp of each baby oil & baby shampoo was sufficient. Pour it in slowly, circling round the roll. It still won't appear to be enough liquid at first, but in time the water will seep through, saturating it all nicely.
Next I'd like to try the solution with wash cloths to save on paper towels...=)

4) scarf hangers
Here was a simple diy organization project that I could do without buying a thing! (isn't that the idea of re-purposing? it killed me when one comment to a re-purposed craft blog said, "any particular place where I can find fruit boxes?" really?!) Of course, I adjusted it as I felt would be best. The scarf storage has been an issue, and though I have so many, I wear the same few because the rest get lost under the pile. This is much better.
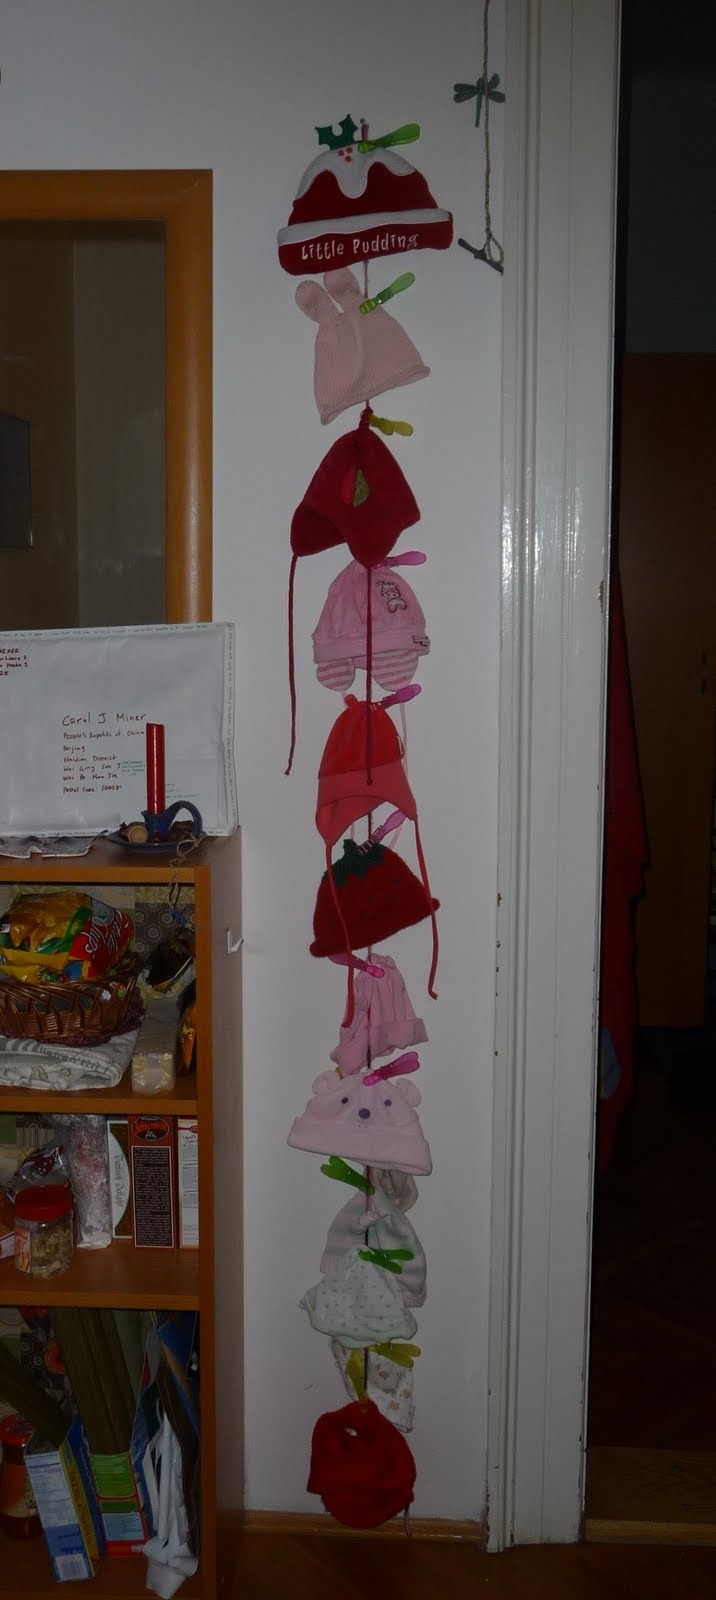
5) hat storage
This is not from pinterest. But now it could go on pinterest. And its in the same spirit of making this apartment nicer. Kudos to Elizabeth; I saw it hanging in her place. Now I can display all of Julie's cute hats, plus they are where I can see all of them, hopefully avoiding the sad "oh, she never wore that hat and now it's too small for her" fate.
Sunday, August 16, 2009
crocheting, etc.
I've taken up a few new hobbies. Perhaps I should add blogging to the list again. Actually, "the inspiration" comes just because I happen to have more time on my hands for a few weeks. We've returned from summer travels, and are back at work, but the school building closes at 3pm, and of course there's no grading or planning to take home, so the evenings have been long.
Last week on Tuesday, I was already bored at 5pm and didn't relish a long evening of nothing-ness. So Garrett and I looked up Indian recipes and headed out with a list. We found a little Indian spice store just 5 blocks from our house that we had heard of, and got most of what we needed. We made chicken makhana, and it tasted quite good. We were rather impressed with ourselves!
 We also made up chipatis from Mark's How to Cook Everything book. They came out fairly well, despite the mis-purchase of what we hoped would be whole wheat flour.

A few weeks ago I pulled out some yarn and crochet hooks from a give-away pile, and decided I would learn. I've perused several "how to" videos on youtube and tried numerous times to simply make a regular pattern, as you would start a scarf. I consistently got stuck on starting the second row, and it always looked hideous. This afternoon I took it up again, and this time followed her videos on making the "granny square." She gives the best detailed instructions out there for someone who is just beginning, and I completed my first project!
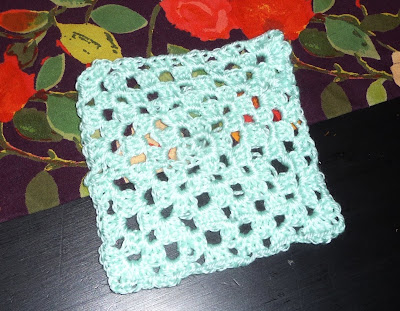 I suppose it is a hot pad for our dinning room table. I'm just going to stop there and let it be that: the next one will be better, I trust.
Last week on Tuesday, I was already bored at 5pm and didn't relish a long evening of nothing-ness. So Garrett and I looked up Indian recipes and headed out with a list. We found a little Indian spice store just 5 blocks from our house that we had heard of, and got most of what we needed. We made chicken makhana, and it tasted quite good. We were rather impressed with ourselves!
 We also made up chipatis from Mark's How to Cook Everything book. They came out fairly well, despite the mis-purchase of what we hoped would be whole wheat flour.
A few weeks ago I pulled out some yarn and crochet hooks from a give-away pile, and decided I would learn. I've perused several "how to" videos on youtube and tried numerous times to simply make a regular pattern, as you would start a scarf. I consistently got stuck on starting the second row, and it always looked hideous. This afternoon I took it up again, and this time followed her videos on making the "granny square." She gives the best detailed instructions out there for someone who is just beginning, and I completed my first project!
 I suppose it is a hot pad for our dinning room table. I'm just going to stop there and let it be that: the next one will be better, I trust.
Friday, August 24, 2007
sewing
 I've just about became addicted to sewing. My sister gave me her sewing machine before moving back to Prague, and when I returned from summer travels, I took it out.
First, I bought all the necessary notions (that's a nice word).
 Then I proceeded to make myself a simple, gathered skirt. Which it is.
Then I had to make a dust cover for my sewing machine. And then I made little "pillows" stuffed with balsam fir from Maine, because it smells good. Then I hemmed two pants, and I'm working on re-making an old dress I have. The to-do list is huge.
The first week of work (pre-planning, when I can still leave work at work) I couldn't stop sewing every night. Now, it's not so much. But it just feels right when I do. I feel sorry I never discovered this until now.
My childhood memories of sewing are horrible. I never did thread the machine properly, and the bobbin always got caught. I don't know why it's different now. But I officially have a new hobby.

Subscribe to:
Comments (Atom)